Wednesday, February 9, 2011

Anthropologie Inspired Ruffled Pillow Case

I saw these on the Anthropologie website and knew I needed them.  But who wants to pay $48 dollars for a pillow case? 
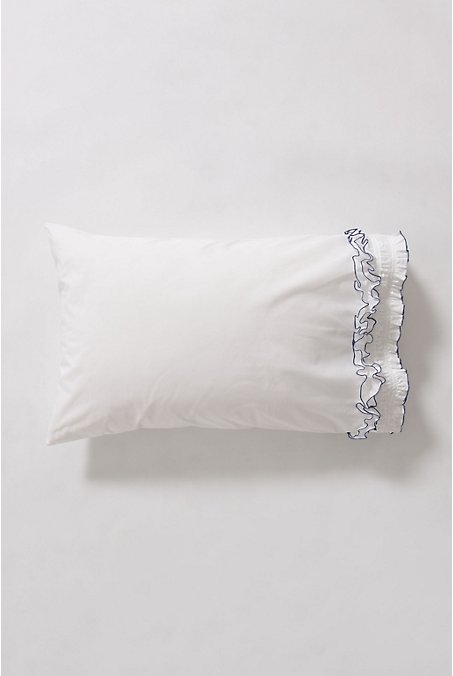

So I made theses instead.  


I think they turned out pretty great.  Plus I finally got to use this cream and white stripped fabric I've been dying to use but haven't found the right project for. 


I used the tutorial from MADE for pillow case dimensions and basic assembly.  If you need it, I suggest going there for extra help. 

Materials:
About 1 3/4 yards of fabric
Wooly nylon serger thread (optional)

1.     Construction:
     
1.  1.  Cut Material.  Use the chart below.  You will end up with 4 rectangles.  All dimensions below are in inches. 

Rectangle
Folded
Unfolded
 Main Piece 1
20.5 X26
45 X 26
Main Piece 2
20.5 X 11
45 X 11
Ruffle 1
45 X 6
90 X 6
Ruffle 2
45 X 7
90 X 7


Again, MADE has some diagrams here that might be helpful for the main pieces.  The ruffled pieces will look like this (folded in fourths):


I happened to have a large piece of fabric to use.  If you do not, you may need to sew two pieces together to get the correct length for the ruffled pieces.  This will be perfectly fine.  The ruffles will hide any seams you don't want showing.

2.  Iron the border piece in half so that you have a folded rectangle measuring 11" X 20.5".

3.  Serge edges.  Take both ruffle pieces and serge the long edges of each to prevent from fraying.  I used wooly nylon thread and set my machine up to do a rolled hem to get the effect you see in my pictures (see your owners manual for set-up).  


**If you do not have a serger I suggest doing a tight zig zag and triming the edges or using a rotary cutter to trim the edges to keep from fraying.  Some sewing machines can also do a rolled hem.  Check your manual.  You may need an extra foot to do so.

4.  Iron.  Take the 6" ruffle piece and iron almost in half.  I allowed the bottom layer to show about 1/2 an inch (as shown below).  Make sure the serged edges you want showing are facing up.  


5.  Gather.  Set your sewing machine up for a gathering stitch (longest stitch length, highest tension).  Sew about 1/4 inch down the folded edge.  Do not back stitch at the front or end of the stitch.


Leave your settings the same and sew two gathering stitches about 1 1/2 inches from each side of the other strip.  


Take the bobbin thread of the folded piece and pull until the piece begins to gather.  Gather until it reaches the same length as the border of the pillow case.


Do the same for the other ruffled piece.  


I like to lay my pieces out on the pillow case to make sure I have gathered them to the correct length.  


Iron the ruffles down.  This will make it easier to sew.  


6.  Pin.  Take the folded ruffle.  With right side up, align it with the edge of the pillow case where the border piece will attach.  Then take the border piece and align the raw edges, right sides together to create a sandwich.  


Like this.


Pin in place.


7.  Sew.  With a 1/2" seam, sew the sandwich together.


Thread your serger back to normal.  Serge of the seems.  Or zig zag stitch and trim.


Turn and Iron out the seams.  No need to top stitch.  This part will be covered.  


Now you should have this.


8.  Pin.  Align the the next ruffled piece with the top edge of  the border so that the ruffles just cover the border underneath but still allow the ruffles to show at the other end.  Pin in place.


9.  Sew.  Secure the ruffle by sewing in two places.  I sewed directly over  the gathering stitches that were already on the ruffle.  If the gathering stitch is not straight, do your best to sew a straight line as this will be visible on the completed pillow.  


Use your hand to flatten down the ruffles as you sew.


Unpick any gathering stitches that are not in line with the new stitch. 


Now you should have this.


Originally I planned to sew 1/4" bias tape over the top of the stitching.  I liked how it looked when I got to this part, so I left it off.  Your call.

10.  Finish.  Fold the pillow case right sides together.  Pin edges and sew a 1/2 inch seam allowance. 
  

Sege off the seems or zig zag and trim.


Turn pillow case so right sides are out and push out corners.  Iron seams flat. 


Put that pillow case on your pillow and rest your head a little.


Or play a little.  Whichever you prefer.


Be careful..things might get a little too crazy.


So don't be surprised when your model gets grumpy and decides to take a nap instead.


**Update.  If you became a follower of my blog and and want to enter the giveaway, be sure to leave a comment on the giveaway post telling me so.  For those who did not know you needed to do that, I am extending the giveaway a few days to give you a chance to enter.  Go here to enter.  


So sorry for the inconvenience.

Monday, February 7, 2011

More Valentines Day


If you have a girl and do not own the Leila and Ben "Sweet Little Dress" than you need to solve that problem.  Soon.  It's only 6 bucks and totally worth it.  It comes in baby and toddler size.   You can buy it here.


Why is it worth it?


1.  It helped me (as a beginner) figure out how dresses are put together so that I can now draft my own patterns.


2.  It is EXTREMELY versatile.  You will know what i'm talking about if you check out week 2 of Project Run and Play.  


Honestly, I have loved making this dress.  Not only because it is super easy to construct, but because I love changing it up.  I've made 3 versions in the last 2 months.  Here is my latest, perfect for V-Day:


The Changes:

1.  Lining.  I added a lining to the dress because the heart fabric you see on the outside is thin and see through.  Plus, an extra layer in the winter can never hurt.  Right?  

To add the lining, I simply cut the lining material to the same size as the rest of my dress.  I left the sleeves unlined.  When I ironed over my casing, I ironed both fabrics together and secured them with the top stitch like in the pattern.  


The only somewhat tricky part was sewing up the side seams.  I didn't want the inner layers to be connected at the side seams, so I pulled the outer layer away and flipped the dress so that the lining layers were right sides together and pinned.


Sew up the side seams and the sleeves as you normally would.  Just be sure that you don't catch any of the outer fabric when you sew the bottom corner where the sleeve meets the lining.  You can see this in the picture below.


Once you've sewn the lining and the sleeves, turn the dress right sides out and sew the main dress pieces  as it shows in the pattern. 

2.  Sleeves.  All I did to change the sleeves was leave out the elastic.  Simple, but I love how it makes the sleeves puff out a bit.

3.  Waistband.  Once the dress was constructed, I added a waistband.  I used the lining and the outer fabric to make the casing for the elastic.  I sewed 3 lines about 1/2 inch apart where I wanted the waist to be through both layers of fabric.  I left a small opening at the end of each line to insert the elastic.  Then I used a safety pin to insert 3/8 inch elastic into each of the 2 casings and sewed the elastic together before sewing each of the casings closed.  The length of my elastic was my daughters waist measurement.

4.  Length.  Last, I chopped off a few inches of the original pattern to make the dress into a shirt.  My almost 8 month old still fits into the 3-6 month pattern and I still had to crop a few inches.  We are a little vertically challenged around here.  


So there you go.  Get the pattern and try some variations of your own.  

Oh and don't you just LOVE the fabric...vintage from my grandparents old stash.  So great.


Saturday, February 5, 2011

First Giveaway!

***This giveaway is now closed***


1st ever (on my blog) Giveaway!!!


with


Because there has to be a first for everything...


we're giving away 2 patterns from the V and Co. Shop!  Yup, one winner will receive 2 patterns of their choice from Vanessa!  


She has amazing patterns for quilts, clothes, and home decor.  Her site is also stocked with cute ideas.  Some of my favorites:


And, she is being featured 3 times in the upcoming book Fresh Fabric Treats, which you can pre-order from her shop.


If you haven't seen her site, you really must take a look.  She has some of the most beautiful patterns and pictures in craft world.  And, if you missed her on TV yesterday (yes, she was seriously on TV!), you can check it out here.


So, back to the giveaway.  

To enter:

1.  Follow my blog (current or new) and leave a comment telling me you did so.

Extra entries for:

2.  Telling someone else about my blog/giveaway (By any means possible. Facebook. Blog. ect).  Leave a separate comment for each so that you get an extra entry for each.  

Thats it.  2 ways to enter.  1 way to win.  Please leave a separate comment for each entry below and provide your email address so I can get in touch with you when you do win.  

Giveaway will close February 14th at midnight.  Winner will be chosen via random.org and announced February 15th.  Good luck!

Wednesday, February 2, 2011

"Love Struck" Pillows


I live in an apartment (a product of the husband being in grad school) and the Valentines decor is somewhat lacking.  The husband isn't too fond of themed decor.  I'm slowly converting him.  Very slowly. So I thought these pillows were a nice, not too over the top, compromise.

Plus, I finished them rather quickly which is always a huge plus in my book.

Materials:
-Fiber Fill (whatever kind you liked best)
-1/2 yard of your choice of fabric for the pillows (I used duck canvas)
-black fabric paint
-paint brush
-freezer paper
-Picture of you and your love (you could also use clip-art)
-Cupid print out (I found mine online for free)
-Cardboard square (small)

*I realized about half way through how easy this would be if I only had a Silhouette.  Oh how I want one of you.  I'm sure you could find a cupid in their online store or import one of your own.  But it is still a quick project even without, so lets move forward.  

Construction:

1.  Cut.  Cut fabric into 4 squares 13 x 13.

2.  Sew.  Take two pieces of fabric.  With right sides together, sew around all four edges with a 3/8 inch seam leaving about a 5" gap along one edge for stuffing.  Repeat for other two squares.  


3.  Trace.  Take your images and tape to cutting board.  Place freezer paper over the top of image shiny side down.  Trace with an exacto knife to cut image out on freezer paper.  You will end up saving the outline not the actually cut out image, so don't throw away the scraps (I used Made's directions for the freezer paper stencil.  Go here if you need more help).  Repeat with second image.  


**You want to keep everything on the left side of the photo...you do not need the piece on the right.  

4.  Iron.  Place your freezer paper stencil onto your canvas exactly where you want your image to show up.  Iron down stencil.  Be sure to get the edges really well so that paint doesn't seep through to unwanted areas.


5.  Paint.  Take a small piece of cardboard and stuff through hole.  Using your brush, paint a few coats over the freezer paper directly onto the canvas. 


**Stain remover takes away any unwanted paint from canvas that may or may not have gotten there during painting.  Or so i've heard.  


6.  Let dry and seal with iron. 

7.  Stuff.  Fill pillow with fiber fill or stuffing of your choice.

8.  Hand sew pillow closed.  I used a whip stitch to close off the pillow.  I started the knot inside the seam and then did some close together stitching around the seam to close the gap. 


Enjoy!