Showing posts with label clothing. Show all posts

Wednesday, November 2, 2011

A cape, a hat, and a skirt.

I can't seem to do much on time these days, but I thought I'd share our little one's Halloween costume anyways.


The inspiration for this little costume was this hat I found via Pinterest.  I didn't have enough felt on hand to make the hat following the tutorial exactly so I used the pattern pieces (adjusted slightly to fit a smaller head).  I cut out 2 of each pattern piece from an old black skirt and one of each pattern piece from interfacing to make it slightly stiffer.  I ironed the interfacing onto one of the rim pieces and one of the hat pieces then sewed same pieces together with right sides together.  I clipped around the curves of the rim and turned each piece so the right sides were facing out.  Once I got here,  I was able to follow the rest of this tutorial to finish it up.  I love how it turned out.


The cape was made from 1/2 yard each of two contrasting fabrics.  I sewed the two pieces right sides together around three of the sides with 1/2 inch seams leaving one of the long edges completely un-sewn.  Then I clipped the corners and turned it right side out.  With a gathering stitch (longest stitch length, highest tension) I sewed along the long end that was left un-sewn and then gathered the cape to the desired length by pulling the bobbin thread.  It was about 21 inches long for my 17 month old.  I made some thick black bias tape (about 1 yard in length) and pinned the cape inside of the bias tape right in the middle so there were two tails on either side of the cape of the same length.  To finish the cape I sewed the bias tape together along the open end to enclose the cape inside.  


To make the tulle skirt I used 4 yards of tulle (I got it on sale at Joanne's so it only cost me about 4 dollars).  Rather than cut strips and tie around a waist band as I've seen almost everywhere else, I made mine similar to the way I made this three tiered skirt.  To keep it super easy I folded the tulle evenly until it was 1 yard in length and then cut the three tiers out of the folded tulle.  This gave me 3 tiers that were actually 4 pieces of tulle (folded over) each.  Then I sewed my gathering stitch along the top end of each stack of 4 layers to get each tier.  Once I had gathered the 3 sections, I pinned and sewed each section onto the skirt piece really close together.  I wanted the tulle to add volume more than I wanted the tiers to be distinguishable.  It worked exactly as I planned and made a super cute skirt with tons of volume.  I made the whole skirt in about 30 minutes.  


We took most of the pictures in the dark, but htis one is a good shot of the skirt and cape.  I'm excited because each of these pieces make really great dress up's and the'll fit her for quite a while too!


For kicks, here are our last years Halloween Costumes:


I got my inspiration from this little stop light I saw on MADE and went from there.  The two street signs are made of felt.  I free handed the shapes and traced the letters, cut them out and sewed them on. The traffic signal jumper is made of fleece with felt circles sewn on top.  Super easy.  Sorry i'm late in posting....you can always pin it for next year :)

Wednesday, August 24, 2011

Toddler Vest

So auditions are over for SYTYC and although I didn't make it into the competition, I still wanted to share my project with you.  Some of the other audition pieces were great, so I'm not at all surprised.  Especially since my project caters to such a small audience.  But since you read my blog and know what I'm about (which happens to be 50% girls clothing) I figured you might want to see it and know how I made it.  

Toddler Vest, 2 Ways


This project is super easy.  It took about 30 minutes to make both of them (probably another reason why I didn't move on in the competition....but that's how I roll people....simple and fast)

And it comes with easy variations.  There's the slightly-less-fast ruffled collar vest.  The pictures are crazy because the model is crazy.  The hem is not wonky like it looks in the pictures, it's just because she won't stand still for 2 seconds for me to take a pictures.


And the 'plane jane' white vest.


I didn't take pictures along the way, but it's so simple, I promise you won't need them.

Here's what you need to do:

1.  Measure.  
A: The distance between shoulders (armpit to armpit).  Mine- 7.5"
B:  From the top of the shoulder to the bottom of the armpit.  Mine- 3.5"
C: from shoulder to where you want the vest to fall.  I chose below the waist about half way down the leg, but it's up to you and the style you want to achieve.  Mine-17"
**Write all of these down so you don't get half way through and have to chase down your model to get them a second time.  

2.  Cut your rectangle.  Start with a rectangle of cotton jersey.  Use measurement A to calculate how long by tripling the distance.  Use measurement C to determine how long.  Since we're using jersey there is no need to account for seams unless you don't like the raw edges.  Mine ended up being 22" x 17".

3.  Cut your armholes.  Fold your vest in half and place a few pins to keep it in place.  Use measurement A to determine how far in from the fold to cut the armhole.  To determine how far from the top, use 3.5" for small children and adjust up to 6" for larger children.  This all depends on how large you want your collar to be.  Use measurement B to determine how long to cut the hole.  When you cut, you will be cutting both armholes at once so there is no need to repeat this process a second time.  No need to finish armholes because they won't fray.  My hole was 3 3/4 inches in from the side (7/2), 3.5" from the top, and 3.5" long.  

4.  If you wish to have a 'plane jane' vest like the white one, you can stop now.  If you want ruffles like the red one you'll first need to round off your corners.  I did this by tracing the lid of our clothes hamper onto the vest and cutting off the excess.  Then I cut a 2" piece of the same fabric (I had to sew a few scraps together to get it long enough) and ruffled it by sewing a gathering stitch (longest stitch length, highest tension, walking foot if you have one) and pulling the bobbin thread to get desired ruffles.  Then I pinned the ruffled strip around the entire vest on the outer edge and sewed directly over the gathering stitch to secure it to the vest. 

If you have any questions just ask!  Sorry for lack of pictures.  Hope it makes sense.  


Monday, March 28, 2011

Denim Part 2: Paper Bag Shorts/Pants

Like I mentioned before, I LOVE denim.  So naturally, I couldn't resist making another paper bag style bottom.  You can see the skirt version HERE


I've seen this style (hidden elastic gathered waist) in a few places.  I made a skirt for myself based on an Anthropologie skirt I saw a few months ago...unfortunately they no longer sell it online so I don't have a picture for you, but I will post about mine soon.  More recently, I have seen this style at GapKids.


I copied the name because I'm not really sure what to call them.    
 And they do kind of resemble a paper bag with the gathering at the top.  Almost as if you picked up a paper bag and squeezed it around the top to close it.    


I don't have a tutorial for these because it would be copying and pasting most of the Paper Bag Skirt tutorial, but I will explain how I made them in case you'd like to try to.

Instructions for Paper Bag Shorts/Pants:
1.  Similar to how Dana at Made makes her pants, I traced a pair of good-fitting shorts.  If you are making shorts, your pieces will turn out somewhat "L" shaped (to accommodate for crotch space).  For pants, follow MADE's instructions for cutting out and sewing the fabric.

2.  Once you have cut and sewn together your pieces, you will want to hem the pants similar to how we hemmed the skirt here.  Serge off 1/4 inch along the top edge (waistline) and iron it over 3/4 of an inch.  For the leg opening, serge off 1/4 inch and then fold over 1/2 inch and iron down.  If you are not serging fold over 1/4 inch in place of serging to hide raw edges.

3.  Attach 1/2 inch elastic inside the pants just below the folded edge of the waistline just as we did with the skirt.  I recently added an update that looks nicer on the inside.  Be sure to check it out if you want a cleaner looking inner.  Do the same for the leg openings.

4.  Make and attach belt loops.  I figured out a super easy way to make and attach belt loops, way easier/better looking than the ones I made for the skirt.  For the full tutorial, click HERE.

5.  Make the belt the same way we did for the skirt (or use the same one....they can't wear them at the same time anyways).  Be sure your belt loops are wide enough to fit the belt you wish to use.

YAY!  You're done.  We're really in to clapping these days...


 These shorts took me 30 minutes to make (I didn't remake the belt...but I'm considering making one out of printed fabric for contrast).  I think they would look cute with pockets too.  I'll probably add them next time. 

  
Once again, we have bad weather for pictures (it's snowing again) so we opted to stay indoors for photos.  


I had to bribe her with her water bottle to get her to go up the stairs so you could see the back....smart.


And when I wanted her to sit, she kept sliding off the stairs.  One of these days I'll have a more cooperative model.  


Oh, and if your wondering where I got the adorable bow and headband...it's from our sponsor, Little Daisy's Boutique.  You'll hear more about them later, but I just wanted you to know how awesome they were in advance.  

AND, I was featured over at Knock Off Decor today.  Go check it out, and while you're there look around for awhile.  Becky has a really awesome compilation of great DIY knock-off's to try.  


This post was sponsored by The Trading Post.


Create.  Trade.  Be happy.

Easy Belt Loops

This is the easiest/ cleanest looking way to make belt loops that I have found. 


Materials:

coordinating fabric scraps

Construction:

1.  Start with a fabric rectangle.  Mine is 2 1/2"x 3".  This size rectangle will accommodate a 1" wide belt when finished.  Increase the length (and width if desired) to accommodate the style of belt you plan to use with the belt loops.

2.   If you are using a serger, serge off 1/4" from both short ends of the rectangle.  If you are not using a serger, fold over each short edges 1/4" and iron flat.  I did one of each to demonstrate both.


3.  Fold the rectangle in half lengthwise with wrong sides together.  Serge off 1/4" down the long end.  Or sew with 1/4" seam, zig-zag and trim. 


4.  Iron flat so that the seam is in the middle of the belt loop.  It will look like this on the back:


and this in the front:


5.  Top stitch along both long edges to hold in place.


6.  Pin the belt loop onto your clothing with one of the serged (or folded) edges down.  The right sides of the belt loop and the clothing should be touching.  Your belt loop will stick up like this: 

**Above: You are looking at the right side of my fabric and the wrong side of the belt loop.

7.  Sew the belt loop on with 1/4" seam.  


8.  Fold the belt loop over and iron flat against your clothing piece.  Pin in place.

**Once folded, you are looking at the right side of the clothing and the belt loop.

9.  Top stitch (1/8" seam) along the top and bottom of the belt loop to hold in place.  I went over the seam 2 or 3 times to secure.  


Now you have hassle free, beautiful looking belt loops.  


Enjoy!


Thursday, March 24, 2011

Denim Part 1: Paper Bag Skirt

I love denim.  I think it is the most versatile part of  any wardrobe...so easy to dress up or down and goes with just about everything.  Baby S needed some cute denim in her spring/summer wear, so this skirt was born.  I think it's my favorite skirt to date.  If I make it again I might tweak it a little, but overall, I like it a lot.  


Ok, so I need to clarify...I actually used a chambray for this skirt.  It's lighter and easier to gather than denim, but if you have an old worn out skirt or pair of jeans you want to recycle, you could probably still pull it off. 

The numbers in red are those used to make a skirt that fits my small 9 month old (like she still fits in her 3-6 month clothes with room, small).  Adjust numbers as necessary.

Materials:
1/2 yard fabric (more for larger skirts)
1/2" wide elastic
coordinating thread 

Construction:

1.  Measure.  

A.  Measure around the fullest part of the hips.  Mine was 21".
B.  Measure from the waist to desired length.  Mine was 10" for a high waisted skirt.
C.  Measure around the waist.  Mine was 16".

2.  Calculate and Cut.  Stay with me.  I have it written in what looks like a lot of steps, but it's just a few rectangles and actually really easy.

You will end up with 5 pieces for this skirt.  

The picture above shows pieces 1- 4.  However, I had to trim a few inches off of pieces 1 and 2 after taking this picture.  The directions below are more accurate than the photo.  

Piece 1 and 2:
Take measurement A and add 5 inches (4 for roominess and 1 inch for seems).  Then divide that length in half.  This will be the width.   You could skip this step and keep it as one long piece for a single seem skirt.

Example:
21" + 5" = 26"  
26"/2 = 13"  

For the length, take your measurement B and add 1 1/2" (seams and top hem).  Then subtract 4 inches (for the ruffle bottom).

Example:
10"+ 1 1/2" = 11 1/2"
11 1/2" -  4" = 6 1/2"  

My first two pieces will be 13" x 6 1/2"

Pieces 3 and 4:

Take measurement A and add 5 inches.  

Example:
21" + 5" = 26"  

Cut 2 pieces that are (A + 5") by 5".

My pieces are 26" x 5".


Piece 5:
The last piece is for the bow that ties in front.  Take Measurement C and add 15".  

Example
16" + 15" = 31"

Cut a piece that is (C + 15") by 2 1/2"  (larger if you want a thicker belt).

My piece is 31" x 2 1/2".

**I also added 4 belt loops to the skirt at the end.  If you would like to add this, cut 4 rectangles that are 2 1/2" x 2".  If you made the bow larger, you will need to lengthen the belt loops to accommodate a larger belt.  

3.  Prepare the ruffled bottom of the skirt.

Take the two longest pieces (3 and 4).  For the bottom hem, fold over 1/4" and iron.  Then fold over 1/4"again and iron.


With right sides together, sew a 1/2" seam down the short edges of these pieces to create a tube with two seams.  Serge off seams or zig sag and trim.  When I sewed my pieces together I opened up the hem (as seen below) then re-folded it after it was sewn to hide the seam inside the hem.  

Ignore the serged edge above.  It is unnecessary when making a double fold hem.


 Set your machine to a gathering stitch (longest thread length, highest tension) and sew across the top of the piece with a 1/4" seam.  Pull the bobbin thread to gather to desired length, or the length of your main skirt piece which should be measurement A + 5".  Mine is 26".


4.  Prepare the skirt.
Some of the pictures for step 4 turned out too blurry to post.  We're still dealing with horrible weather/no sunlight some days.

Sew main skirt pieces (1 and 2) together along short edges, right sides together, with 1/2" seam to create a tube.  Serge off seams or zig zag and trim.  I also serged the top of my skirt at this point (no pictures).

Fold down the top of the skirt 3/4 inch and iron down.  If you did not serge you will need to fold over 1/4" then 3/4" again and iron flat.  (I did this after attaching the ruffle, but I recommend doing it before.)  It is important to follow these measurements exactly in order to attach the elastic properly later on.  


Top stitch with a 1/2" seam to finish the top of the skirt.


5.  Attach the ruffle.  

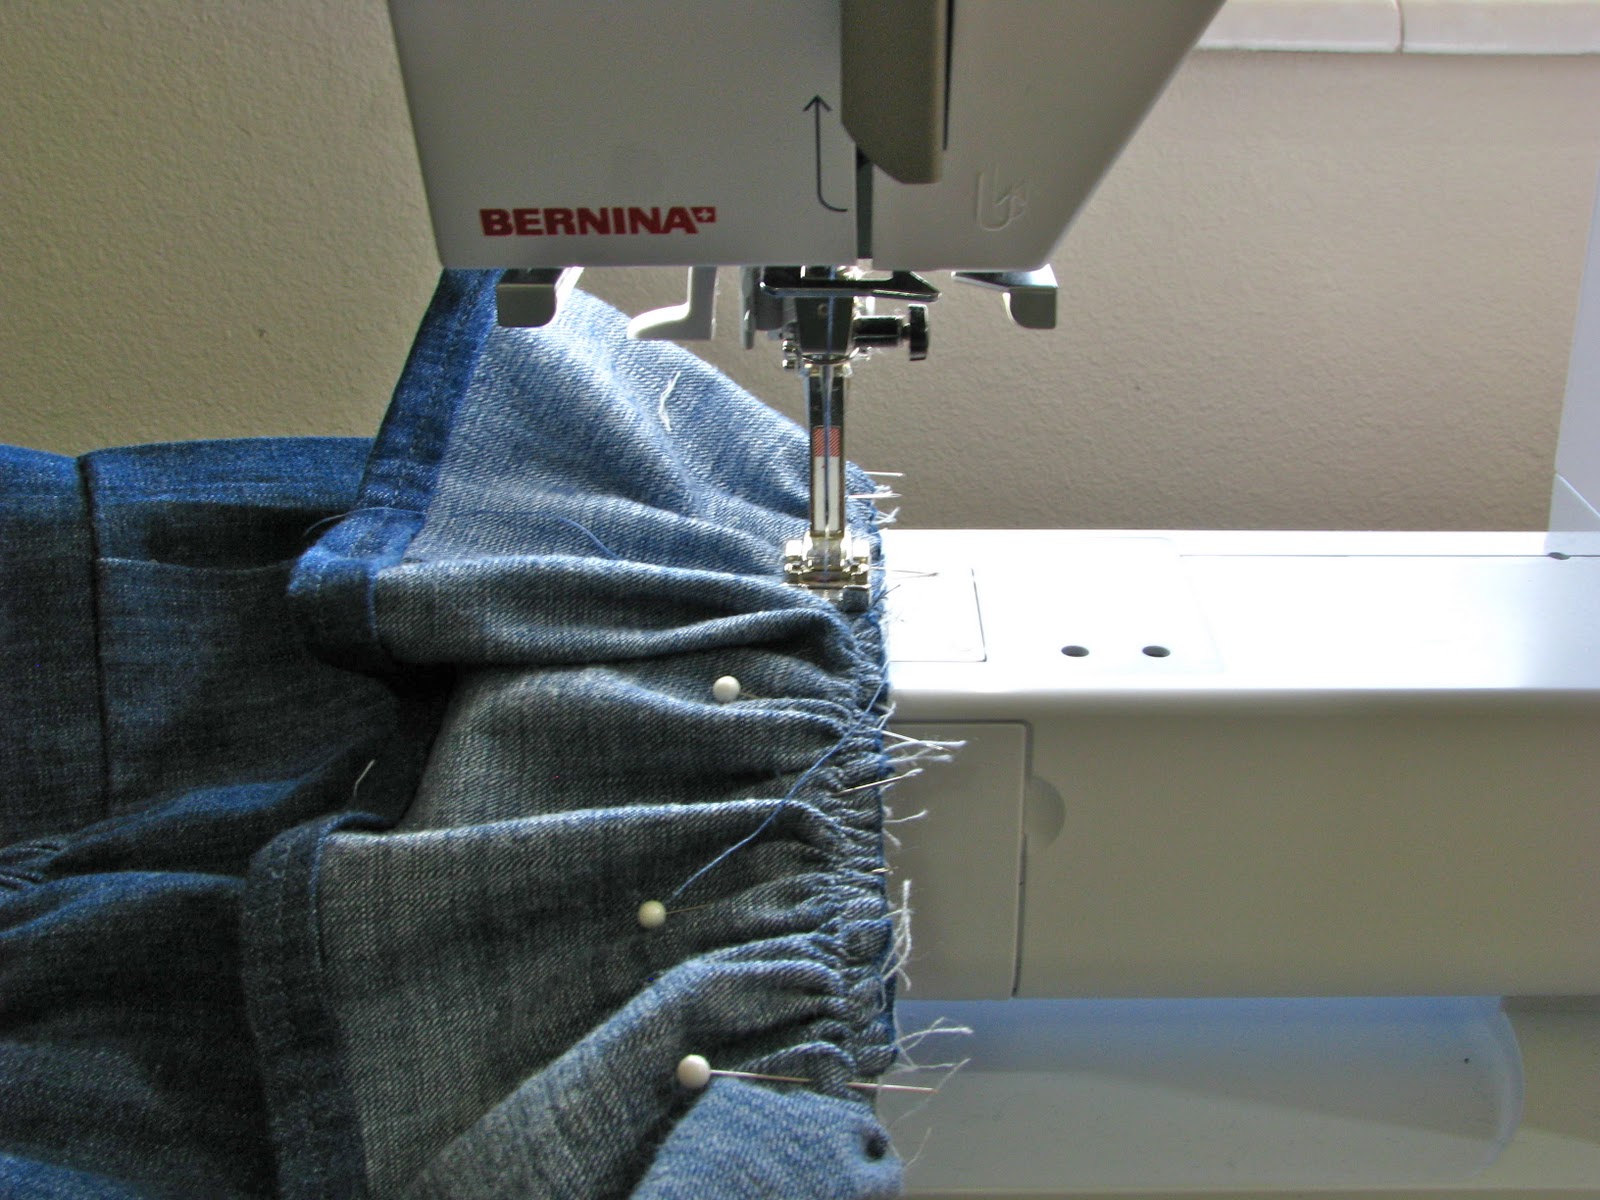
With right sides together, line up the seams of the ruffle with the seams of the skirt and pin.


Sew ruffle onto skirt with 1/2" seam.  Serge off seams or zig zag and trim.  


Now you should have a piece that looks like this (except your top will already be hemmed and finished).


6.  Creating the elasticated waist.  

Sew your elastic together to create the waistband (See the ruffled headband tutorial here if you don't know how).

Take your elastic waistband and pin in 4 spots (evenly spaced) right below the top hem inside the skirt.  To be sure your pins are evenly spaced, I pin at the side seams first and then find the mid point between the side seams on the elastic and the skirt piece and pin there as well.


The next one is kind of blurry, but may be more helpful.


Then, using one hand as your guide and the other to stretch the elastic as you go, sew your elastic onto your skirt by sewing a 1" seam on top of your skirt.  Stretch and sew from pin to pin.   


You skirt is finished!

***UPDATE:  I recently made another version of this skirt with a casing for the elastic.  Looks very similar on the outside, but quite a bit nicer on the inside if that matters to you at all.  All I did was cut a strip of fabric 2 1/2 inches wide.  I ironed in the long ends 1/2" on each side and sewed it to the inside of the skirt leaving an opening for the elastic to be inserted, closing it up afterwards.  

7.  Make the bow.  

Take your long bow piece.  Fold in half lengthwise with right sides together and sew a 1/4" seam.  I attached a safety pin to the inside of the fold before sewing to help turn it right side out after I sewed.  

Trim edges on a 45 degree angle.


Clip corners (like the triangle below.  Then tuck in edges in and iron flat.  


Top stitch around the entire belt piece to secure edges.

8.  Belt loops.  ***UPDATE:  For an easier/better/prettier looking belt loop, go to my tutorial HERE.  You will be sad if you don't because the method below is not so fun.  

This was the most annoying part, but worth it.  Fold your pieces in half right sides together and sew along two edges leaving one short end open.  Again, I attached a safety pin inside the fold to help turn them right side out after sewing.  


Clip corners.


Push safety pin out open end to turn.  Push out corners.


Top stitch around entire belt loop.


Pin belt loops to skirt.  I attached them about 3 inches about in the middle of the front and the middle of the back.  I made sure the top of the belt loop was 1/4" above the thread that attached the elastic waistband.  To make sure the belt loops are on evenly, stretch out the waistband.  


Attach belt loops by to skirt by sewing 1/4" from the top of the belt loop (in line with the waistband seam) and 1/4" from the bottom of the belt loop.  


Thread your belt through the loops and tie a bow in the front (I think it looks cute with the bow in back too)!

And you are done!  It took me about 1 hour to finish this skirt (that was with taking pictures and re-adjusting measurements).  In all, a pretty fast completion.  Love that!

Yes, the skirt is on crooked, but it's the only front shot I took so I'm trying to deal with it.


Sorry about the middle finger.  I didn't notice till after I took it but I still kind of love this picture....not sure what that says about me.


Yes, we're crooked again.  I made the skirt about 1/2" too big so that it will fit longer.  I'm now paying for that decision.


I've linked this up to these lovely places.  


This post was sponsored by whoopdwhoop; the currency free, creative marketplace.