Showing posts with label accessories. Show all posts

Thursday, March 17, 2011

Anthro-Inspired Knotted Headband

I love this knotted headband from Anthropologie...


but I had a problem similar to the one that forced me to make these Anthropologie Inspired Pillow Cases.  Who really wants to spend $28.00 on a headband?  Not me!  So I made it instead.  


It was easy and free because I used supplies I already had on hand.  


Here's how:

Materials:
  • 4 scraps of material
  • 1" wide plastic headband (mine is 1"in the middle and gets slightly smaller at each end)
  • glue and glue gun
  • fray check (optional)


Construction:

1.  Cut your pieces.  
a.  3" x 16"
b.  2" x 3" (cut out two)
c.  5" x 11" (this is generous in length)


2.  Iron.

Take your longest piece (a) and mark the center with a fabric marker on the wrong side of the fabric (my finger is marking this spot on my strip).  Iron over a 1/4 inch seam starting at the mark and gradually increase to a 1/2" seam at the end of the piece.  **If your headband is 1" all the way to the ends, iron it over 1/4 all the way down the strip. 


Do the same for the other end of the same side.  Repeat for the opposite long edge on same fabric piece.  You will have something that looks like this: 


Iron the two small pieces (b) by folding both sides in toward the center like strip on the left.


Fold it again so all the raw edges are hidden in the center.


Take the last piece (c) and fold both edges in toward the center.


3.  Tie a loose knot in the center of the same strip (c).


Twist the ends so the raw edges are facing down and the knot is facing up toward you.  It will look almost like a bow.


Set the knot aside.

4.    Cover the headband.  

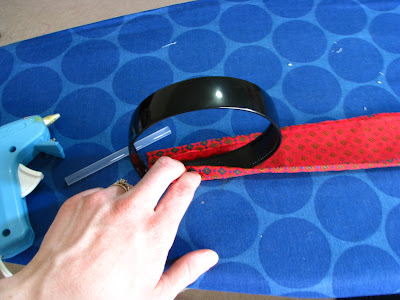
Take the long piece of fabric.  Place one end of the headband on the end of the fabric strip.  Put glue directly on the headband close to the edge nearest you.  Fold the edge nearest you over the the headband and press.  

 I found that my material stretched as I glued.  If your material is stretchy I would recommend starting in the middle of the headband and fabric so the middle of the fabric (where it is largest) will line up with the middle of the headband.  This is only important if your headband gets smaller at each end.


Put glue directly on the headband next to the fabric you just glued down and fold over the other side of the fabric and press down to glue.  Be sure you pull the fabric tight so that it is not loose but instead fits snuggly around the headband. 


Continue doing this, one side after the other, until the entire headband is covered.  Keep pulling the material tight as you glue so there are no wrinkles or bubbles when you look at the front of the headband.  Since my material stretched, I had excess fabric which I trimmed before the next step.  


5.  Cover the ends.  

Put glue on the front and back of the end of the headband and sandwich one of the small pieces (b) around the headband end.   Press the fabric into the glue to hold.     


Wrap one end of the fabric around to the back and glue in place.  Wrap the other end around and glue on top of the first end.  Use the fray check on the exposed raw edge to keep from fraying.  Repeat with the end.


Now you have a completely fabric covered headband that looks pretty cute on it's own.  You can stop here if you'd like.  See?  

**ignore the slightly greasy, unwashed hair.... I had no where to be yesterday.

6.  Attach the knot.

Try the headband on to figure out where you want the knot to attach.  Usually slightly off centered.  Mark it with a fabric marker or with your finger.  Place glue over the marked spot and put the center of the knot over the glue.


Wrap one end of the fabric under and glue on the inside of the headband.


Wrap the other end of the fabric under and glue on top of the first end.  Trim excess fabric and use fray check to seal exposed edges.  

You are done!  Easy peasy.


Now excuse me while I clean up the fabric scraps my daughter chewed on while I worked because she was being ignored.  So much for folding and organizing those scrap drawers last week.  


Happy Friday!  I hope you have a wonderful weekend.  I know I will.

Oh and don't forget; only two more days to enter the Benzie Felt Giveaway!  Don't miss out!  

Saturday, January 15, 2011

Gathered Flower Tutorial

**Disclaimer-I swear I own a bottle of lotion.  The winter just happens to hate my skin.  


I've heard them called pinwheel flowers as well, but they don't resemble a pinwheel as much as I'd like, so I'm going with "gathered" instead.


Materials:

-square piece of scrap fabric (any size will do)
-scissors
-needle and thread
-coordinating button or other center for flower

*Many types of fabric will work for these flowers.  I love the way felt holds the gathers but I also like the way a knit fabric makes a fuller, softer looking flower.  It just depends on what look you are going for.

Steps:

1. Fold fabric in half and then in half again.  You should now be looking at 1/4 of the original square.


 2. Cut the raw edges (unfolded) to resemble 1/4 circle.


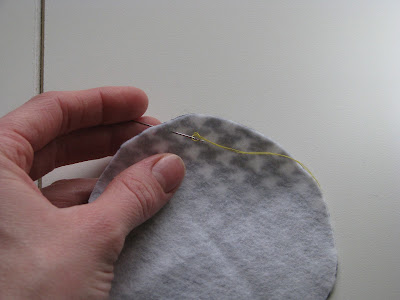
3. Insert needle into wrong side of fabric and begin a running stitch along the outside edge.


 4.  Continue to stitch, gathering up the fabric. The more consistent you make your stitch size, the more regular your gathers will look in the end.  Note that the larger the stitch length, the smaller the gathers will be.  The opposite is also true (smaller stitch length = larger gathers).


5.  When you reach the point where you started, pull the thread tight to gather in all of the fabric.


*This fabric is a little easier to see than the black and white felt.


6.  Use your fingers to push the gathered edges in on itself and run a few stitches across the gathers to help them stay put.


*Again, this fabric shows it a little better than the felt. 

7.  Use the same needle and thread to sew on your center.  If you did not use a button, hot glue will work as well.


They look really cute on headbands.  But I think they would go well on jackets or clutches as well.


Version #2

I avoid using a needle and thread unless it is absolutely necessary. Naturally, I had to know if I could make these using my sewing machine.  I found it didn't make too much of a difference with the smaller flowers (might have even been easier to hand sew) BUT if you need larger flowers, machine is definitely the way to go. 

Steps:

1.  For larger flowers I used my rotary cuter and cut around a large plate.


 2.  For a finished flower of about a 6 inch diameter, you will want to cut a circle with a 10 inch diameter.


3. Set your machine to sew a gathering stitch (longest stitch length and highest tension). 

Using a 1/4 inch seam, sew around the outer edge of your circle.  Do not back stitch at the beginning or end.  Also, be sure not to overlap threads when you circle back to your first stitch.  I suggest ending a little below where you started so that you don't leave out any of the fabric when you start to gather it.


 4. Take both ends of the bobbin thread and pull gently.  As you pull, use your other hand to push the  fabric you are gathering away from the ends you are pulling. GO SLOW!  If you try to do it quickly, you may break the gathering stitch and have to start over.


 5.  You should end up with something that resembles this.


6.  Rather than stitching the center closed as I did before, I used hot glue and pushed the edges together in the center.


7.  I also glued on my center...no reason to break out the needle and thread now! 


*The above picture shows the difference in sewing by hand and by machine.  The flower on the left was sewn by hand and the flower on the right by machine.  It is easier to get the gathers closer together when sewing by hand because you can adjust your stitch length to very long.  Your machine stitch length has a limit so your gathers are likely to look a bit larger (smaller stitch length) than when sewing by hand.  I do like the full look of the flower on the right (machine sewn).  Both were made of the same jersey cotton.  

Tuesday, January 11, 2011

Ruffled Headband

Headband headache- the pain that occurs when a headband squeezes too tightly just behind the ears. 

I love headbands.  I wear one pretty much everyday. They hide my curly mess and frizz and I couldn't live without them.  BUT...I hate when headbands "squeeze" my brains out.  


Not only are these headbands cute, but the entire band is made of elastic so they come with a no pain guarantee!  

Materials:
-21 inches of 1 inch wide elastic
-30" x 4" of fabric
-coordinating thread
-safety pin

1.  Cut fabric and elastic.


2.  Iron each short end of your fabric down about 1/2 inch.


3.  Attach a safety pin to the middle of the right side of your fabric (this is to make turning your fabric easier after it is sewn).


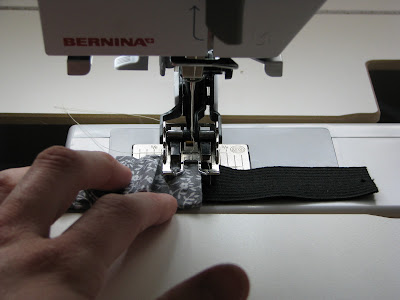
4.  Fold fabric in half right sides together and sew a 1/4 in seam.  Use your hand to keep the edges together as you sew.  The picture below shows 1/2" seam which is wrong.


5.  Turn fabric right side out by pushing the safety pin towards the opposite end from where it is pinned, allowing it to pull the fabric inside the tube behind it.  


6.  Remove the safety pin from the fabric and pin it to one end of the elastic.  Use the safety pin to insert the elastic into the fabric tube.


7.  Pull fabric towards the center of the elastic leaving 3" of exposed elastic on each end of the band.  Pin the fabric in place.

8.  Using a combination of pulling on both ends of the elastic at the same time and straightening with your fingers, spread the ruffles out on the band until they look nice.  Iron the ruffles in place.  Do not skip this step.


**If you have a quilting foot, switch to it now.  It makes sewing over the bulky ruffles a bit easier.  Your regular foot will work, just be sure to iron well to get rid of some of the bulk.

9.  Topstitch across each end of the fabric to secure fabric to elastic.  Use a 1/8 inch seam.


10. Topstitch along each side of the band to secure the ruffles in place using 1/8 inch seam.  This is not an exact science.  The ruffles create an uneven edge.  I find it easiest to pick a spot on the band to focus on and then keep everything in line with that point.  The ruffled edges may not stay exactly at the 1/8 inch seam.  Do your best to keep the sewn line straight, even if it means letting some ruffles exceed the 1/8 inch seam. Also be sure not to sew over the elastic.


11.  Fold the band in half, right sides together (both sides should be basically the same).  Sew the elastic ends together using a 1/2 inch seam.


12.  Fold the elastic ends open and topstitch the loose ends down onto itself (Sew about 1/8 inch in either direction from the center seam).  See next two pictures for clarification.


And now your done.  They look really cute as is, or spice things up by adding flowers, rosettes or buttons!


 **For the smaller baby size I used 1/2 inch elastic and 24"x 3" fabric.  I measured the elastic around her head for the length.  


All headbands above are now for sale in my etsy shop, Homestitchedbyellie.  Go check it out.