Headband headache- the pain that occurs when a headband squeezes too tightly just behind the ears.
I love headbands. I wear one pretty much everyday. They hide my curly mess and frizz and I couldn't live without them. BUT...I hate when headbands "squeeze" my brains out.
Not only are these headbands cute, but the entire band is made of elastic so they come with a no pain guarantee!
Materials:
-21 inches of 1 inch wide elastic
-30" x 4" of fabric
-coordinating thread
-safety pin
1. Cut fabric and elastic.
2. Iron each short end of your fabric down about 1/2 inch.
3. Attach a safety pin to the middle of the right side of your fabric (this is to make turning your fabric easier after it is sewn).
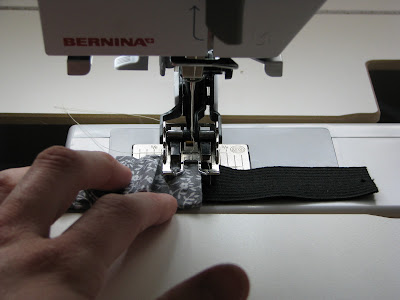
4. Fold fabric in half right sides together and sew a 1/4 in seam. Use your hand to keep the edges together as you sew. The picture below shows 1/2" seam which is wrong.
5. Turn fabric right side out by pushing the safety pin towards the opposite end from where it is pinned, allowing it to pull the fabric inside the tube behind it.
6. Remove the safety pin from the fabric and pin it to one end of the elastic. Use the safety pin to insert the elastic into the fabric tube.
7. Pull fabric towards the center of the elastic leaving 3" of exposed elastic on each end of the band. Pin the fabric in place.
8. Using a combination of pulling on both ends of the elastic at the same time and straightening with your fingers, spread the ruffles out on the band until they look nice. Iron the ruffles in place. Do not skip this step.
**If you have a quilting foot, switch to it now. It makes sewing over the bulky ruffles a bit easier. Your regular foot will work, just be sure to iron well to get rid of some of the bulk.
9. Topstitch across each end of the fabric to secure fabric to elastic. Use a 1/8 inch seam.
10. Topstitch along each side of the band to secure the ruffles in place using 1/8 inch seam. This is not an exact science. The ruffles create an uneven edge. I find it easiest to pick a spot on the band to focus on and then keep everything in line with that point. The ruffled edges may not stay exactly at the 1/8 inch seam. Do your best to keep the sewn line straight, even if it means letting some ruffles exceed the 1/8 inch seam. Also be sure not to sew over the elastic.
11. Fold the band in half, right sides together (both sides should be basically the same). Sew the elastic ends together using a 1/2 inch seam.
12. Fold the elastic ends open and topstitch the loose ends down onto itself (Sew about 1/8 inch in either direction from the center seam). See next two pictures for clarification.
And now your done. They look really cute as is, or spice things up by adding flowers, rosettes or buttons!
**For the smaller baby size I used 1/2 inch elastic and 24"x 3" fabric. I measured the elastic around her head for the length.
All headbands above are now for sale in my etsy shop, Homestitchedbyellie. Go check it out.












Cutest headbands ever! Now I just need to convince my 1 year old to keep one on her head:) Thanks for auditioning for American Crafter!
ReplyDeleteThese headbands are so cute! I love the ruffle effect and how you can add flowers and things to them. Thanks so much for sharing this great idea! I will have to try making me some of these. A girl can never have too many headbands right? :)
ReplyDeletejustenoughstyle.blogspot.com
Love the headbands!! Wish I had a girl that could wear them (and I have a feeling Bart would flip out if I tried to put them on Jack). :) Awesome blog!
ReplyDeleteSo excited that you started this! I check your blog for fun ideas all the time and now that you started your own sewing blog... the possibilities are endless. Thanks for the tutorials! You're the best!
ReplyDeleteGreat tutorial--thanks for sharing! I'll have to see if one of these will control my crazy hair!
ReplyDeleteThese are darling!!
ReplyDeleteLove these. I hate getting a "headband headache" :) Thanks for sharing. We will be featuring you on our blog ziggycrafts.blogspot!
ReplyDeleteThese are so adorable! I wish it wasn't so late I'd go make one for myself right this minute! Thanks for sharing :)
ReplyDeleteEllie,
ReplyDeleteVery cute! I love headbands, so this is right up my alley :)
happy crafting!
Linda
Love these! So much better than just the elastic. Thanks for sharing!
ReplyDeleteGorgeous! Will make some, thank you for sharing! :)
ReplyDeleteThanks for the tutorial. You will be featured on my blog in the morning. http://fabricbowsandmore.blogspot.com/
ReplyDeletelove these!! my uncle calls headbands "head tourniquets"-lol :)
ReplyDeleteI have a question-in step 4 you say to do a 1/4" seam, but it looks more like you're sewing a 3/8" or 1/2"-which is correct?
thanks for the tutorial!!
This comment has been removed by the author.
ReplyDeleteLoralee,
ReplyDeleteOh yeah...I'll fix that in the tutorial. It really should be 1/4. The first time I made it I used 1/2" seam (like you see in the picture) and it was harder to sew when I got to step 10. If you look at the pictures of all of the headbands, you can see that the gray floral one has less material along the edges where it should be ruffled. The others look a but nicer (in my opinion) and I used 1/4" seam on them.
k-I figured I should do what you say, not what you do-hehe :) but I definitely wanted to check b/c I was wondering about those side seams in step 10 as well.
ReplyDeletethanks so much!!
Very cute! I wish I could wear headbands like that, but they slip off of my head. :(
ReplyDeleteGreat idea to make them that way and so many possibilities!
SO IN LOVE WITH THESE HEADBANDS!
ReplyDeleteFound them and the link to your blog on Pinterest.
I'm going to make lots of these...LOL ♥
I love those, absolutely brilliant ! My girls will love them and no more headband headaches :)
ReplyDeletegracias me encantaa
ReplyDeleteSOOO Cute Thank you soo much I love them!
ReplyDeleteToo pretty!making some asap!
ReplyDeleteFor the baby headband, when did you sew the buttons on?
ReplyDeleteThis is a great tutorial! Thanks! I'll make some for me and my daughters!
ReplyDeleteIts a great style to make headbands. Here you can get organic and stylish wholesale headbands
ReplyDeleteits very interesting style for making such kind of sweet hairbands..i like it
ReplyDeleteI visited your blog for the first time and just been your fan. I Will be back often to check up on new stuff you post!
ReplyDeletevintage baby headbands
This is Very beautiful. We must try it.
ReplyDeleteI love those, absolutely brilliant ! My girls will love them and no more headband headaches :)
ReplyDeleteWow. The Hair Accessories are so nice.
ReplyDeleteOoh love this idea! It's awesome! Why not add some nice elements to the headband with Grosgrain Ribbon?
ReplyDelete