**Disclaimer-I swear I own a bottle of lotion. The winter just happens to hate my skin.
Materials:
-square piece of scrap fabric (any size will do)
-scissors
-needle and thread
-coordinating button or other center for flower
*Many types of fabric will work for these flowers. I love the way felt holds the gathers but I also like the way a knit fabric makes a fuller, softer looking flower. It just depends on what look you are going for.
Steps:
1. Fold fabric in half and then in half again. You should now be looking at 1/4 of the original square.
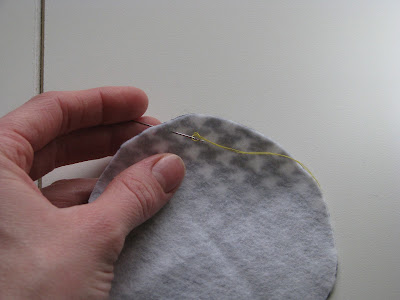
3. Insert needle into wrong side of fabric and begin a running stitch along the outside edge.
4. Continue to stitch, gathering up the fabric. The more consistent you make your stitch size, the more regular your gathers will look in the end. Note that the larger the stitch length, the smaller the gathers will be. The opposite is also true (smaller stitch length = larger gathers).
5. When you reach the point where you started, pull the thread tight to gather in all of the fabric.
*This fabric is a little easier to see than the black and white felt.
*Again, this fabric shows it a little better than the felt.
7. Use the same needle and thread to sew on your center. If you did not use a button, hot glue will work as well.
They look really cute on headbands. But I think they would go well on jackets or clutches as well.
Version #2
I avoid using a needle and thread unless it is absolutely necessary. Naturally, I had to know if I could make these using my sewing machine. I found it didn't make too much of a difference with the smaller flowers (might have even been easier to hand sew) BUT if you need larger flowers, machine is definitely the way to go.
Steps:
1. For larger flowers I used my rotary cuter and cut around a large plate.
3. Set your machine to sew a gathering stitch (longest stitch length and highest tension).
Using a 1/4 inch seam, sew around the outer edge of your circle. Do not back stitch at the beginning or end. Also, be sure not to overlap threads when you circle back to your first stitch. I suggest ending a little below where you started so that you don't leave out any of the fabric when you start to gather it.
6. Rather than stitching the center closed as I did before, I used hot glue and pushed the edges together in the center.
7. I also glued on my center...no reason to break out the needle and thread now!
*The above picture shows the difference in sewing by hand and by machine. The flower on the left was sewn by hand and the flower on the right by machine. It is easier to get the gathers closer together when sewing by hand because you can adjust your stitch length to very long. Your machine stitch length has a limit so your gathers are likely to look a bit larger (smaller stitch length) than when sewing by hand. I do like the full look of the flower on the right (machine sewn). Both were made of the same jersey cotton.


Thanks for this - especially showing both the machine and hand-sewn versions. Looks so simple that I want to jump up and find some spare fabric right now!
ReplyDeleteThese are so cute. I'll be making them for the elastic headband you have on your site. Thank you for sharing your talents.
ReplyDelete