I love this knotted headband from Anthropologie...
but I had a problem similar to the one that forced me to make these Anthropologie Inspired Pillow Cases. Who really wants to spend $28.00 on a headband? Not me! So I made it instead.
It was easy and free because I used supplies I already had on hand.
Here's how:
Materials:
- 4 scraps of material
- 1" wide plastic headband (mine is 1"in the middle and gets slightly smaller at each end)
- glue and glue gun
- fray check (optional)
Construction:
1. Cut your pieces.
a. 3" x 16"
b. 2" x 3" (cut out two)
c. 5" x 11" (this is generous in length)
2. Iron.
Take your longest piece (a) and mark the center with a fabric marker on the wrong side of the fabric (my finger is marking this spot on my strip). Iron over a 1/4 inch seam starting at the mark and gradually increase to a 1/2" seam at the end of the piece. **If your headband is 1" all the way to the ends, iron it over 1/4 all the way down the strip.
Do the same for the other end of the same side. Repeat for the opposite long edge on same fabric piece. You will have something that looks like this:
Iron the two small pieces (b) by folding both sides in toward the center like strip on the left.
Fold it again so all the raw edges are hidden in the center.
Take the last piece (c) and fold both edges in toward the center.
3. Tie a loose knot in the center of the same strip (c).
Twist the ends so the raw edges are facing down and the knot is facing up toward you. It will look almost like a bow.
Set the knot aside.
4. Cover the headband.
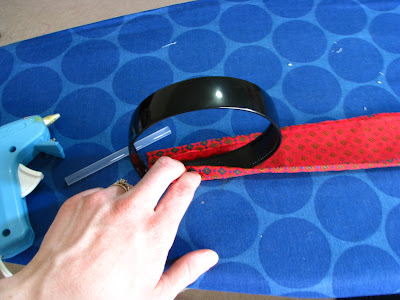
Take the long piece of fabric. Place one end of the headband on the end of the fabric strip. Put glue directly on the headband close to the edge nearest you. Fold the edge nearest you over the the headband and press.
I found that my material stretched as I glued. If your material is stretchy I would recommend starting in the middle of the headband and fabric so the middle of the fabric (where it is largest) will line up with the middle of the headband. This is only important if your headband gets smaller at each end.
Put glue directly on the headband next to the fabric you just glued down and fold over the other side of the fabric and press down to glue. Be sure you pull the fabric tight so that it is not loose but instead fits snuggly around the headband.
Continue doing this, one side after the other, until the entire headband is covered. Keep pulling the material tight as you glue so there are no wrinkles or bubbles when you look at the front of the headband. Since my material stretched, I had excess fabric which I trimmed before the next step.
5. Cover the ends.
Put glue on the front and back of the end of the headband and sandwich one of the small pieces (b) around the headband end. Press the fabric into the glue to hold.
Wrap one end of the fabric around to the back and glue in place. Wrap the other end around and glue on top of the first end. Use the fray check on the exposed raw edge to keep from fraying. Repeat with the end.
Now you have a completely fabric covered headband that looks pretty cute on it's own. You can stop here if you'd like. See?
**ignore the slightly greasy, unwashed hair.... I had no where to be yesterday.
6. Attach the knot.
Try the headband on to figure out where you want the knot to attach. Usually slightly off centered. Mark it with a fabric marker or with your finger. Place glue over the marked spot and put the center of the knot over the glue.
Wrap one end of the fabric under and glue on the inside of the headband.
Wrap the other end of the fabric under and glue on top of the first end. Trim excess fabric and use fray check to seal exposed edges.
You are done! Easy peasy.
Now excuse me while I clean up the fabric scraps my daughter chewed on while I worked because she was being ignored. So much for folding and organizing those scrap drawers last week.
Happy Friday! I hope you have a wonderful weekend. I know I will.
Oh and don't forget; only two more days to enter the Benzie Felt Giveaway! Don't miss out!









super cute!!! i'm not a big headband wear-er but that would make a great gift for my nieces-->they would LOVE it.
ReplyDeletelove it! I'm all about anything anthro inspired! Thanks for sharing!
ReplyDeleteI really am impressed with your creations. Great job!
ReplyDeleteBtw, I'm your latest follower from the Boost My Blog Friday. I'd be happy if you can follow back for more mutual blog visits :)