Friday, April 29, 2011

Go vote please!

Extreme Makeover: Fabric Edition

Extreme Makeover projects are up so go over and vote!  I'm loving this competition because I've been able to try so many different things and use up a ton of my stash too!  My comfort zone has tripled in size if thats possible.

I wish I could tell you which one was mine because I love it, but you'll have to wait till Monday to find out.  I have some tutorials for you next week to show you how/what I made.  In the meantime head over to Extreme Makeover Fabric Edition and vote!

Thursday, April 28, 2011

Gathered Jersey Dress

Originally posted at Nap Time Crafters.

Today I have a quick/easy tutorial for you.  You can make it from materials you have on hand, and it only takes 45 minutes to complete (or less if you are more awesome than me and actually do things right the first time)!  I love quick projects that can be finished while my daughter is napping!

I'm going to show you how to turn these:

into a comfy gathered jersey dress:
(yes, my sweet little one is in a cast...if you want details you'll have to read about it here)

Who doesn't love comfy and cute?

Materials:
Mens T-shirt
Baby Onesie
Measuring Tape
Yup, thats all folks!

Before you start:
 Measure the hips and length of the baby/toddler that the dress is for.  If your onesie fits well, you shouldn't need to measure the waist.  Don't forget to write them down.  I hate re-measureing.  

**Adjust the following measurements to fit your model.  My dress was for a small 10 month old.

Construction:
1.  Lay your T-shirt on your cutting board so that the bottom hem is lined up.  Then cut 3 strips that are 4" wide starting from the hem so that one piece utilizes the hem from the old T-shirt.  I used XL but you could definitely get away with a smaller one.  My dress ended up very gathered.

2.  Using your sewing machine, gather the top and bottom of the two un-hemmed (now a word) strips.  Do the same for the hemmed piece, but only gather the edge without the hem.  I do this by setting my machine to its highest tension and longest thread length.

3.  Lay out your pieces and finish gathering them by pulling the bobbin threads on the top and bottom of each strip.  You want to gather the pieces until they are 3-4 inches longer than the widest part of the hips, because every little girl needs some wiggle room.

4.  Pin the top two pieces right sides together.

5.   Serge or zig-zag together using a 1/2 inch seam (no need to trim because t-shirt jersey doesn't fray).  Repeat the last two steps for the bottom skirt piece.

6.  Try the onesie on your model and mark where you want the skirt to go.  When I took it off, I drew a line around the whole thing to makes sure I pinned correctly later ( you can see it if you look really hard).

7.  Stuff your onesie inside your skirt piece so you can see how it matches up.

8.  Flip your skirt piece up over the top half of the onesie so that right sides are touching and pin it in place along the line you drew earlier.  Or wing it if you didn't feel like drawing a line.  I won't judge you. 

9.  Zig zag in place if you wish to keep the bottom half of the onesie in tact, or serge it and cut off the bottom completely!  I originally left the bottom on but think the dress lays better without it, so I ended up cutting it off.

Now you have this:

You can stop now, or take a few jersey strips...

Sew them onto the front with a little rosette...

And end up with this:

All done!

This is where she decides the grass is gross and won't put her legs down in it...for like 10 minutes.

This is when she finally started giving in...but she still thinks it's gross.

And this is complete submission.  I win.
Yes, we like to coordinate our hair accessories with our cast.  Much cuter that way.


This post was sponsored by:


Wednesday, April 27, 2011

Ruffled Bumper Pads

The second part of my Extreme Makeover project. 

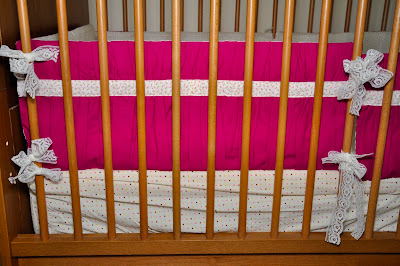
I have an Ikea crib, and if you have one you know that the sizing is just a little off that of other standard cribs...It drives me nuts.  Don't get me wrong, I love our crib...the style and color especially.  Sort of old-school and modern at the same time, but it is hard to find fitting bumper pads.  The ones we had previously were super cute hand-me-downs from my sister-in-law.  I liked them a lot but they didn't quite fit on our crib and always looked a little strange.


My solution was to make bumper pads that were not connected to help them fit better around the crib, which I think they do nicely now.  I mostly used this bumper pad tutorial from Sew4Home but made a bunch of changes.


I used their dimensions for the sizing, but took away about an inch for my crib.  If you have a normal crib you could probably use it as is.

For the ruffled outer pieces, I doubled the length of the fabric, ran a gathering stitch about 4 inches from the top, and then gathered the piece to the correct length.  

I cut out a piece of interfacing the size I wanted my bumper pads to end up and ironed the ruffles onto this to hold it securely.  Then I pinned it and sewed around all the edges.  I would definitely recommend using interfacing if you decided to ruffle your front panel.  It will really help your ruffles stay in place when you get the whole thing sewn together.  

Then I followed the rest of the instructions skipping the cording (I thought it would look funky with the ruffles...now I think it would have worked) and I didn't curve the edges, but left them square instead.  


I don't know how I didn't notice it was crooked when we took the pictures....grrrrr.


Yes, she really does only get a corner because the other half of her room is filled with my sewing stuff and our office space.  You are pretty much seeing the whole thing except for part of the changing table and the glider.  Covered bins are next on my to-do list, along with some wall decals and a new mobile.


This post was sponsored by:


Tuesday, April 26, 2011

Flickr?


 I recently created a Flickr account for this blog.  I'm not sure if any of you have used any of my tutorials, but I hope that eventually you will find some of them useful and try them out.  If you do (or already have), I would love to see what you made/make.  I would love to see how you have improved my ideas, I would love to see your fabric choices, your cute models, your creativity...the list goes on.  If you have or are planning to use a tutorial or idea please take a moment and upload a picture or two showing what you've done.  You can click the link above or on the left sidebar.  It really would mean a lot to me!

If there is some interest and some of you actually add to the pool I would love to feature your creations on my blog.  I'm thinking a monthly (or twice monthly) "Flickr Feature" where I spotlight creations from the Homestitched Flickr pool.  With links back to your blog if you have one, of course.

Other news...it is quite possible that the name of this blog will change in the near future.  When I created this blog I searched 'Homestitched' on every search engine imaginable and nothing came up.  BUT we all know how these things go and now it seems that there is a homestitched.com out there.  It probably won't ever be a problem but I want to keep my options open in case I ever decide to expand this blog into something more (like making/selling patterns).  I have no idea what I will change it to or if I even will, but just wanted to give you the heads up.

On to the real question of the day....

Is it safe to use thread after something like this happens?  I honestly don't know.


Before I caught her, she managed to tangle just about every thread in my drawer.  Nice.


Happy Tuesday!


This post was sponsored by:

Monday, April 25, 2011

Rosette Letters

Since voting is up over at Extreme Makeover, I thought I'd post the how-to for the rosette letters I made for my daughters name.  Did you know which one was mine?  I'm sort of in love with that tent that was made.  Man it's cute.  I can't wait to find out who made it.

Yup her name is Sophie.  I don't think I've ever told you that before.  I think I was nervous to share too much info on the web....but it's getting a little annoying to refer to her as "my little one."  So yeah...now you know.

Materials:
About 1/2 yard of 2 different fabrics for the rosettes (or 1 yard of the same color)
Another 1/2 yard to cover the cardboard letters  
Mod Podge
Glue Gun
Cardboard
Scissors
Marker

Construction:
1.  First, you need to cut out your letters.  I drew them on paper first and then traced them onto my cardboard.  I found it was easiest to cut them out using an exacto knife, but scissors would probably work as well.  

2.  Take your cardboard letter and lay it on top of your fabric (you actually want to do this so that you trace the reverse image onto your fabric, so put the front of your letter face down-I messed up the first time). 

3.  Trace your letter with a marker. 

4.  Clip around all the curves almost to the outline. 

5.  Using a brush, apply mod podge to front of the cardboard letter and press onto your fabric exactly in the outline drawn before.

6.  With your hot glue gun, fold the clipped fabric under and glue to the back of the letter.  Originally I thought I would use mod podge for this but it did not work well.  Trust me and use the glue gun.   
It looks a little scary because it's still wet from the mod podge and has hot glue, but you get the idea.   

Now you have this:

7.  Make your rosettes.    I used a mix of tutorials till I found one I liked.  I didn't like the look of raw edges poking out all over, so I kept the raw edges down as I wrapped.  You are going to need a whole bunch of 1" strips of fabric for your rosettes.  I think I made about 178 rosettes of all different sizes for about 10 inch letters.   My 'S' is about 10 inches the 'o' and 'e' were about 7 1/2 inches tall.


I don't have any more pictures of the rest of the process, but It's easy and quick once your rosettes are done. 

8.  Divide your rosettes into similar sized piles (I made 3 piles for small, medium, and large rosettes).  

9.  Start with the larger rosettes and glue them onto the letter by putting glue on the bottom of the rosette and then placing them where they look good visually.  If you are using more than one color, make sure you use some of both. 

10.  Fill in the gaps with the medium sized rosettes.  When you fill in the gaps you want to make sure to put glue on the sides that are touching other rosettes as well as the bottom.  

11.  Use the smallest rosettes to fill in any leftover gaps.  


A couple tips:
-The key is to really squeeze them together.  Don't distort the rosettes, but make sure you can't see the cardboard peeking through.  

-When it came to the edges, I did my best to conform the rosettes to the shape of the cardboard.  It was much easier than I thought it would be.  


My husband helped my hang them.  We inserted a nail between two if the rosettes and nailed it directly to the wall.


Good luck!  If you try this, please send me pictures.  I want to see them.


This post was sponsored by:

Giveaway and a little something extra...

The winner of the Benzie Felt Giveaway is....


 Congratulations  Emily! I'll be emailing you.  Start picking colors....30 of 'em.


ALSO----

If you helped me out a little over a week ago by filling out the survey from this Please Help! post, stay tuned.

I want you all to know how much I appreciated the help...my does husband too.  It was amazing that so many of you took the survey.  To show my appreciation, I am sending one of you some Benzie Felt as my way of saying thanks.  I wish I could send some to everyone that helped us out, but I am still the wife of a grad student and that is definitely not in our budget this month or any month for the next 2 years.  Maybe when we make it big.

The fairest way I could think to do this was to pick another random number (from the Please Help comments).  Sooo....


Thank you Amy!  I'll be emailing you shortly.  In the meantime, go pick out your colors because you're gonna get some felt too!


Friday, April 22, 2011

Projects are up!

Don't forget to head over and vote for your favorite project!  Voting ends Sunday, so don't wait too long!

Extreme Makeover: Fabric Edition

Thanks!

Thursday, April 21, 2011

Benzie Discount!

**image from Benzie here.

Only a few more days to enter the the Benzie Felt Giveaway and win 30 sheets of felt!  Head over there and leave me a comment.


DISCOUNT ALERT!


If giveaway's are not your thing or you just want to buy some awesome felt, The Benzie Shop is offering a 10% discount to all Homestitched readers through Sunday, April 24th!  Just enter HOMESTITCHED at check out. YAY!


Wednesday, April 20, 2011

Thanks and Apology

The Thanks:
I just have to say you guys are so kind/wonderful.  When I posted about helping my husband with one of his classes we were hoping 10 or 15 of you would donate a few minutes and take the survey!  We had a much bigger response that we could have hoped for.  You guys are so awesome!  I have the best readers.  Don't worry, I'll make good on my promise...if you know what I mean.  And you probably only do if you took the survey and left me a comment.  He got enough results for the survey, so no need to take it anymore.

The Apology:
I'm so sorry for the lack of posting.  I have tutorials coming.  Last week was sort of horrible.  I had to take care of some things that have arisen due to the broken leg and it took up quite a bit of my time.  Thank goodness it is over and we can finally move on.  Less than 2 weeks with the cast!  Phew.

BUT....

I am sewing and have quite a few tutorials in the works.  I have been busy busy busy working on my project for Extreme Makeover Fabric Edition (EMFE)!  I can't wait to show it to you guys.  It's been great to work on things that are a little out of my comfort zone.  If you don't know about the competition go read up on it HERE.  It's hosted by two fabulous ladies (here, and here).  It's all about using fabric from your stash.  It's been great for me, because I have quite the collection (proof here).  We'll have new projects every week and the contestant that uses the most fabric automatically moves on.  Then it's up to the readers to vote on the rest.

I have another tutorial for you this week, but it won't be up till Friday (sooner if I finish EMFE stuff early).  If you missed my tutorial yesterday, be sure to head over to Naptime Crafters HERE to check it out.  It's a cute and easy Jersey Dress you can make out of things you probably already have on hand.

Oh, and don't forget to enter the Benzie Felt giveaway! It is amazing felt and lots of it too.

You guys are great!


This post was sponsored by :


create, trade, be happy