The second part of my Extreme Makeover project.
I have an Ikea crib, and if you have one you know that the sizing is just a little off that of other standard cribs...It drives me nuts. Don't get me wrong, I love our crib...the style and color especially. Sort of old-school and modern at the same time, but it is hard to find fitting bumper pads. The ones we had previously were super cute hand-me-downs from my sister-in-law. I liked them a lot but they didn't quite fit on our crib and always looked a little strange.
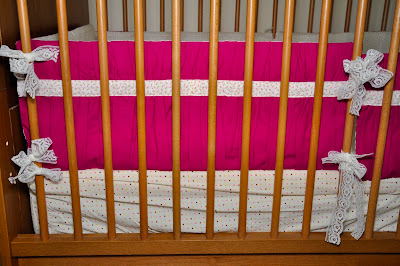
My solution was to make bumper pads that were not connected to help them fit better around the crib, which I think they do nicely now. I mostly used this bumper pad tutorial from Sew4Home but made a bunch of changes.
I used their dimensions for the sizing, but took away about an inch for my crib. If you have a normal crib you could probably use it as is.
For the ruffled outer pieces, I doubled the length of the fabric, ran a gathering stitch about 4 inches from the top, and then gathered the piece to the correct length.
I cut out a piece of interfacing the size I wanted my bumper pads to end up and ironed the ruffles onto this to hold it securely. Then I pinned it and sewed around all the edges. I would definitely recommend using interfacing if you decided to ruffle your front panel. It will really help your ruffles stay in place when you get the whole thing sewn together.
Then I followed the rest of the instructions skipping the cording (I thought it would look funky with the ruffles...now I think it would have worked) and I didn't curve the edges, but left them square instead.
I don't know how I didn't notice it was crooked when we took the pictures....grrrrr.
Yes, she really does only get a corner because the other half of her room is filled with my sewing stuff and our office space. You are pretty much seeing the whole thing except for part of the changing table and the glider. Covered bins are next on my to-do list, along with some wall decals and a new mobile.
This post was sponsored by:










Really cute! That's a big project to tackle, you're braver than me! It turned out great though!
ReplyDeleteI like the ruffle!
ReplyDeleteMy daughter only has 1/2 a room too. She doesn't seem to mind right now though.
Love the ruffles. And yay! I voted for the right one! LOL
ReplyDeleteThese turned out great! I really like the letters, too. Looking forward to seeing what you make this week :)
ReplyDelete